


Plant Profile & Key Characteristics
Overview: A small evergreen bromeliad forming a rosette only 5-20 cm across, grown as an ornamental for its striped foliage and colourful flower bracts. Naturally an epiphyte of tropical forests, it is easily kept as a houseplant in bright, indirect light.
Quick Specifications
| Specification | Attribute |
|---|---|
| Plant Type / Life Cycle | Perennial |
| Foliage Type | Evergreen |
| Mature Size | 5-20 cm (2-8 in) |
| Growth Rate | Slow to moderate |
| Root System | Epiphytic – roots serve mainly for anchorage (can be grown mounted, without soil) |
| Toxicity | Non-toxic (bromeliad) |
| Hardiness | USDA zone 11+ (10b+ with winter protection) |
Growth Form & Structure
- Height & Spread: Forms a compact, water-holding rosette 5-20 cm across; grow it in a small pot or mounted on cork or bark as in the wild.
- Growth Habit & Form: Rosette-forming evergreen epiphyte with a central ‘tank’ (cup) that holds water.
- Lifespan & Maturity: The main rosette flowers once, then produces offsets (‘pups’) that carry the clump on.
Anatomy & Physical Features
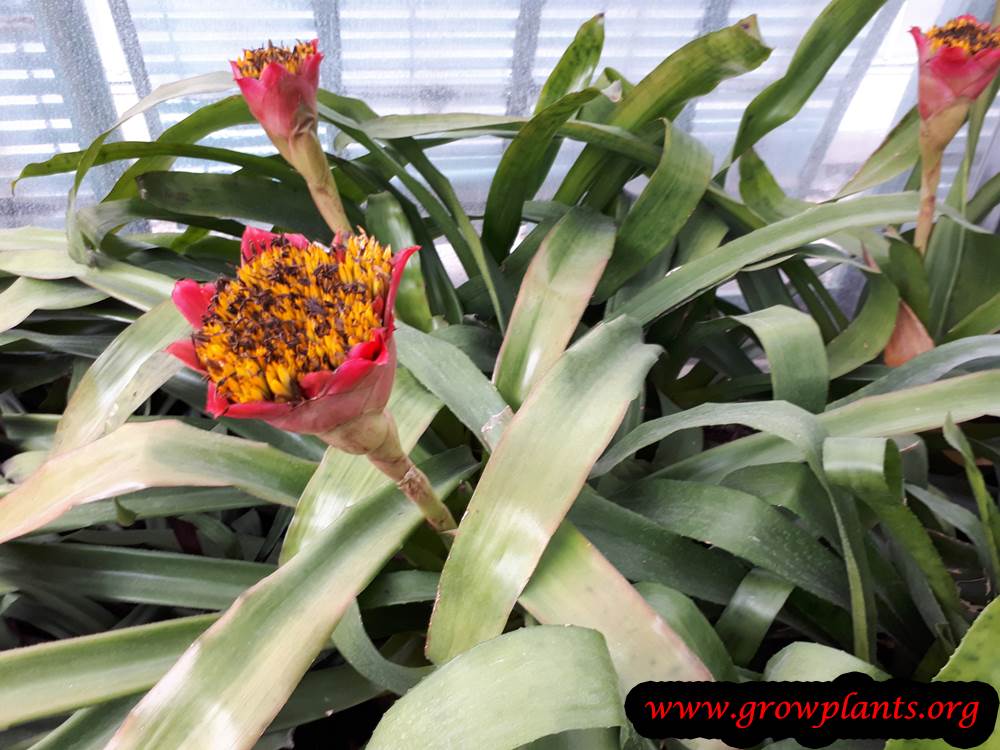
- Leaves & Foliage: Linear, sharp-edged leaves in green, purple or near-black, often banded or striped, arranged in a rosette.
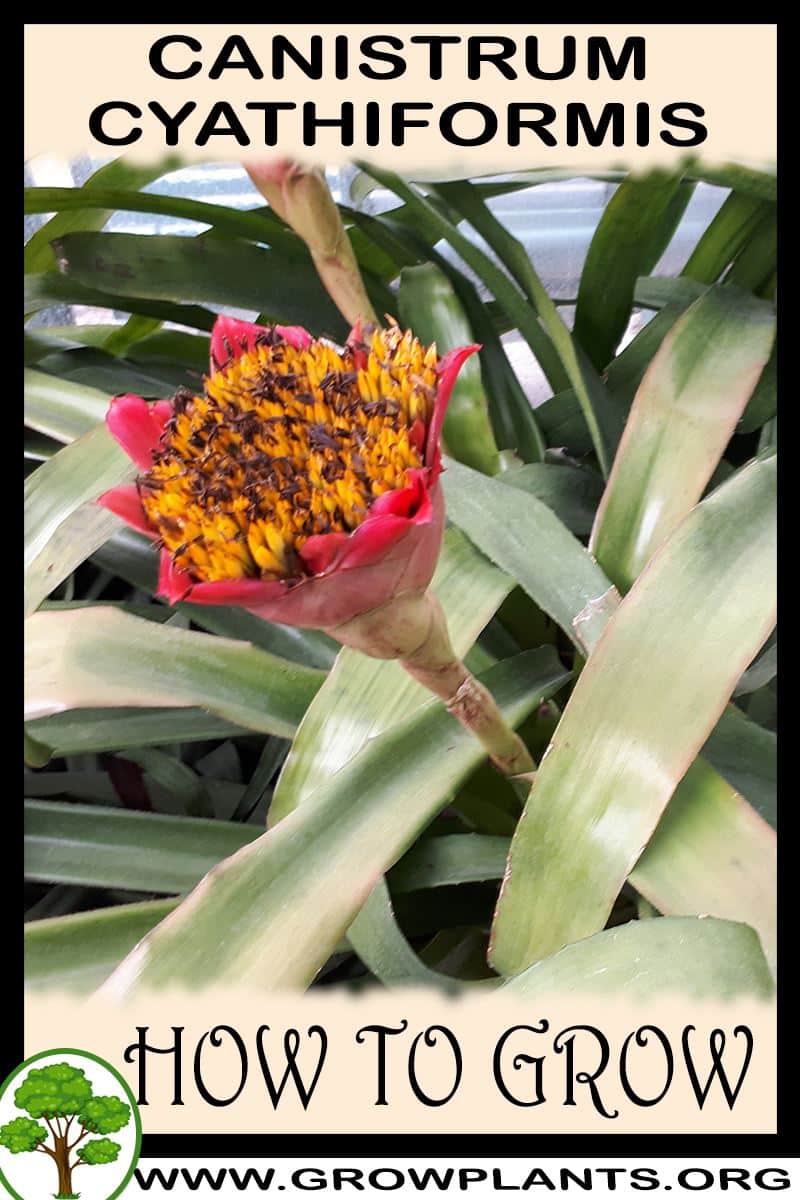
- Flower Characteristics: Bears small yellow flowers in the central cup, surrounded by pink-to-purple bracts (see the Bloom guide for detail).
Primary Uses & Landscape Value
- Functional & Ornamental Roles: Ornamental houseplant, container or mounted specimen; a shade and tropical-garden accent.
Care Guide: Planting, Soil & Watering
Overview: Canistrum is an epiphytic bromeliad that in the wild clings to trees and rocks in humid tropical forest, so it wants warmth (above 15°C), high humidity and a light, airy, fast-draining medium rather than heavy soil. It prefers bright shade out of direct sun, slightly acidic conditions, and water applied into the central leaf rosette.
Quick Care Requirements
| Requirement | Ideal Condition |
|---|---|
| Planting Season | Warm season by zone – spring–summer in 10b, spring–autumn in 11, year-round in 12+ |
| Growth Rate | Slow to moderate |
| Soil Type | Light, airy, very free-draining epiphytic mix (bark / sphagnum) – not heavy garden soil |
| Soil pH | Slightly acidic |
| Water Need | Moderate – fill the central rosette with rain or purified water; keep humid but never soggy at the roots |
Planting & Establishment
- Best Planting Season: Plant in the warm season suited to your zone – spring to summer in 10b, spring to autumn in 11, and year-round in zones 12+.
- How to Plant:
- Hole Preparation: Rather than deep soil, seat it in a small pot of open epiphytic mix, or mount it on cork or bark as it grows in the wild.
- Soil Amendments: Use a light, airy medium such as bark or sphagnum that holds humidity around the roots while draining freely.
- Planting Depth: Keep the base of the rosette at the surface – never bury the crown, which rots if kept wet under soil.
- Growth Speed & Expectations: Grows slowly to moderately, forming offsets (pups) around the mother plant over time.
Soil, Watering & Drainage Care
- Soil Mix & Drainage Needs: Because it is an epiphyte, sharp drainage and airflow matter more than soil – grow it in an open mix or on bark, keeping the roots moist and humid but never waterlogged.
- Watering Schedule & Technique:
- Young / Newly Planted: Keep the medium and roots lightly moist and the humidity high while it settles.
- Established: Water into the central rosette cup, preferably with rainwater or purified water, and let the medium stay lightly moist.
- Seasonal Adjustments: Water more in warm weather; reduce in cool conditions and keep above 15°C for best growth.
Climate, Light & Hardiness
Canistrum cyathiformis is a tropical bromeliad that, in its native forest habitat, grows as an epiphyte high in constant warmth and humidity, so it does best in bright but indirect light rather than direct sun. It needs warm conditions above about 15°C (59°F) to thrive, is reliably outdoors only in USDA zone 11 and warmer, and can extend to about zone 10b with attentive winter care.
Quick Climate Specifications
| Climate Zones | Subtropics, Mediterranean, tropic, or grown indoors as a houseplant |
|---|---|
| USDA Hardiness Zones | Approximately 11 and warmer; possible in 10b+ with careful winter protection |
| Optimal Temp Range | Warm, generally above 15°C (59°F) |
| Approx. Survival Minimum | Can briefly survive down to about 3°C (37°F), though this is not recommended and risks damage |
| Frost Tolerance | None |
| Light Conditions | Half shade without direct light, or full shade with good ambient light |
Sunlight & Light Exposure
Optimal Light Setup
Wants plenty of bright, indirect light rather than direct sun, reflecting its natural role as a shaded forest epiphyte.
Shade & Heat Management
Direct sun will scorch the leaves and flowers, leaving burn marks, so filtered light or full shade with good ambient brightness is preferred.
Best Exposure / Orientation
A bright but sun-sheltered spot, such as under tree canopy outdoors or near, but not directly in, a sunny window indoors.
Temperature Extremes & Hardiness
USDA Hardiness & Regional Limits
Reliable outdoors only in USDA zone 11 and warmer; with attentive winter protection it can be grown down to about zone 10b, and elsewhere it is best kept as a houseplant.
Cold Damage & Winter Protection
Growth suffers well before temperatures approach freezing; the site data notes the plant prefers conditions above about 15°C (59°F) and that while it may briefly survive down to around 3°C (37°F), this is not advisable and risks lasting damage.
Frost Sensitivity
Not frost tolerant at all.
Wind, Humidity & Microclimate
Humidity Preferences
Needs consistently high humidity, reflecting its native tropical forest, epiphytic habitat where rainfall keeps the air and roots humid year-round.
Microclimate Recommendations
Best treated as an epiphyte-style planting, mounted or grown in an open, airy medium rather than dense soil, in a warm, humid, sheltered microclimate away from direct sun and cold drafts.
Growing in Pots, Balconies & Indoors
Canistrum is an epiphytic bromeliad, and the grower notes it is actually easiest to grow as a houseplant – in the wild it perches on trees rather than in soil, so a pot or a mounted piece of bark suits it well. It brings a lush, tropical look to a shaded indoor corner.
Quick Details
- Container Size: A small pot, or mount it on cork/bark – the roots anchor more than they feed
- Indoor Suitability: A good houseplant; easy in bright, indirect light indoors
- Best Spot: Bright shade with no direct sun – hot sun scorches the leaves and flowers
- Soil & Drainage: Very open, well-ventilated, fast-draining bark-based epiphyte mix
- Watering in Pots: Keep the central leaf rosette topped up with water; keep roots moist but never waterlogged
Indoors & On the Windowsill
- A natural houseplant: As an epiphyte it thrives indoors – pot it in an open bark mix or mount it on cork, and water into the central cup of the rosette.
- Light: Give bright, filtered light away from direct sun; a spot near (but not in) a window is perfect. It also copes with fairly deep shade if there is enough ambient light.
- Humidity: It enjoys moist air – mist it or group it with other plants; a bathroom or kitchen window suits it well.
On a Balcony or Patio
- Sheltered shade: Outdoors it wants a shaded, humid, wind-sheltered spot – direct sun will burn the foliage and flowers. Keep the rosette filled with fresh water.
Choosing the Pot, Soil & Long-Term Care
- Pot or mount: Grow it in a small, very free-draining pot of bark-based epiphyte mix, or tie it to cork/bark. If mounted, wrap the roots in bark or moss to hold moisture.
- Watering: Keep the roots moist and the central cup topped up; empty and refresh the cup water now and then to keep it clean.
- Feeding: Feed sparingly with a dilute balanced feed in the growing season – bromeliads are light feeders.
- Repotting: Only pot on when it outgrows its perch; after flowering it produces offsets you can separate and grow on.
Fertilizing & Feeding
An epiphytic bromeliad grown mainly for its rosette of patterned leaves – feeding needs stay light, and a resting period after repotting or during low light should be feed-free rather than pushed.
Quick Fertilizing Specs
| Feeding Level | Light |
|---|---|
| young_feeding | Hold off on any feeding until a newly potted or newly divided offset shows fresh root and leaf growth. |
| mature_feeding | Light, diluted feeding through the active growing season, applied to the potting medium or misted onto the foliage. |
| Main Nutrient Priority | A balanced, nitrogen-leaning feed to support healthy rosette and leaf color without forcing soft growth. |
| Best Feeding Period | The warm active-growth months. |
| Organic Options | A very dilute organic liquid feed is a gentle alternative to synthetic products for this epiphyte. |
| Reduce/Stop Feeding | Reduce feeding in low-light winter months and skip it entirely right after repotting or dividing offsets. |
Feeding by Growth Stage
Establishment After Repotting or Dividing
Let new roots settle into fresh medium or let a separated offset establish before asking it to also process added nutrients.
| Nutrient direction | None – withhold fertilizer while the plant is settling into new medium or recovering from division. |
|---|---|
| Timing | Immediately after repotting, mounting, or separating an offset from the parent rosette. |
| Frequency | No feeding at this stage until fresh root and leaf growth confirms the plant has settled in. |
| Fertilizer types | No feeding at this stage – plain water in the rosette cup and at the roots is all that is needed. |
| Precautions | Do not fertilize a freshly repotted or newly separated offset; wait for clear signs of active new growth first. |
Active Growth
Support fresh leaf production and healthy rosette color during the plant’s main growing period.
| Nutrient direction | A light, balanced feed with a slight nitrogen lean to encourage full, well-colored foliage. |
|---|---|
| Timing | While the plant is actively pushing new leaves from the center of the rosette. |
| Frequency | Feed lightly and infrequently – bromeliads are naturally light feeders and respond poorly to a heavy routine. |
| Fertilizer types | A diluted balanced liquid houseplant fertilizer applied to the potting medium, A very dilute foliar feed misted onto the leaves as an alternative delivery method |
| Routine trace nutrients | iron, manganese |
| Precautions | Avoid letting fertilizer solution sit and concentrate in the central cup, and rinse the cup with plain water periodically to prevent buildup. |
Low-Light or Cool-Season Slowdown
Avoid pushing new growth when reduced light and cooler indoor temperatures naturally slow the plant down.
| Nutrient direction | None – withhold fertilizer while growth has slowed for the season. |
|---|---|
| Timing | Shorter, darker months indoors when new leaf production visibly slows. |
| Frequency | No feeding at this stage – plain water in the rosette cup and at the roots is enough until growth picks back up. |
| Fertilizer types | No feeding at this stage – maintenance watering only. |
| Precautions | Do not fertilize during the low-light slowdown; excess unused nutrients can build up as salts in the medium and the central cup. |
Nutrient Deficiency Signs & Corrections
Leaf color looks pale and washed out instead of the plant’s normal saturated green, purple, or black patterning.
| Possible causes | Too little nitrogen from an overly sparse feeding routine, Insufficient light causing the plant to lose pigment intensity, Salt buildup in the central cup or medium interfering with nutrient and water uptake |
|---|---|
| Appears first on | The newest leaves at the center of the rosette |
| What to check | Check light levels before assuming the cause is nutritional, Flush the central cup and medium with plain water to rule out salt buildup |
| Possible correction | Flush any built-up salts, correct light conditions, then resume a light balanced feeding once new growth restarts. |
Leaf tips turn brown and dry while the rest of the leaf stays healthy.
| Possible causes | Salt or mineral buildup from over-concentrated feeding or hard water, Low humidity drying out the thin leaf tips, Underlying root stress limiting the plant’s ability to move water and nutrients |
|---|---|
| Appears first on | The tips of the older, outer leaves |
| What to check | Check whether fertilizer has been applied at full strength rather than diluted, Check ambient humidity and watering consistency |
| Possible correction | Dilute feeding further, flush the medium and cup with plain water periodically, and raise humidity around the plant. |
Pruning, Training & Seasonal Maintenance
Canistrum cyathiformis is a rosette-forming bromeliad with almost no woody structure to prune — maintenance is limited to grooming spent leaves and, eventually, the flowered rosette itself. Because each rosette is monocarpic (it blooms once and then declines while offsets, or “pups,” take over), the goal is to keep the plant tidy without cutting into the living cup or removing a rosette before its pups are self-sufficient. Grooming can be done at any time of year and has no effect on future flowering, since a rosette that has already bloomed will not bloom again regardless of how it is trimmed.
Quick Pruning & Maintenance Specs
| Pruning Tolerance | Low (grooming only, not true structural pruning) |
| Primary Pruning Window | Any time of year, as needed |
| Typical Frequency | Occasional – whenever a leaf browns or a rosette finishes blooming |
| Main Objective | Remove dead or damaged leaf tissue and spent rosettes; make room for pups |
| Young Plant Priority | Leave fully alone while establishing |
| Mature Plant Priority | Groom old leaves; manage post-bloom rosette decline and pup succession |
| Best Tool Type | Small precision snips |
| Avoid Heavy Pruning During | Always – this species has no woody framework to hard-prune |
Pruning by Plant Age & Size
Newly Established
Do not remove any leaves from a newly potted or newly rooted offset; every leaf is needed to fund establishment. Only trim leaf tips or bases that were damaged while separating the offset from its parent.
Young / Formative
No structural training applies — rosette shape is fixed by the plant’s own growth habit, and there is nothing to stake, pinch, or train.
Mature / Established
Once a rosette has flowered and begins to decline, leave it in place until its pups (which emerge at the base) are large enough to support themselves, then cut away the exhausted parent rosette at its base so light and space reach the new growth.
Special Growth to Remove
- Dead or browned leaves: cut cleanly at the base where they meet the rosette; do not tear, which can damage the central cup.
- Spent flower stalk: once the bracts and flowers have fully faded, cut the stalk back to the rosette.
- Exhausted parent rosette: remove only after offsets are self-sufficient, since the declining parent continues to feed them.
Container & Small-Space Pruning
Grown in a pot or mounted as an epiphyte, the main task is keeping the central cup and leaf axils free of decaying debris, which holds moisture against the crown and invites rot or mealybugs. There is no canopy or height control involved, since the rosette stays within its fixed 5–20cm size.
Tools
- Precision snips: the only tool needed — for trimming dead leaf tips, spent flower stalks, and separating pups.
Tool Hygiene & Disease Risk
Routine hygiene is sufficient — wipe blades clean between plants. Mealybugs are this species’ main pest risk and can be carried on tools or hands, so avoid moving straight from an infested plant to a clean one without wiping the blade.
Cut Placement & Technique
Cut dead leaves at their base close to the rosette, angling the cut away from the central cup to avoid nicking healthy tissue or introducing water and rot into the crown.
Heavy Pruning & Rejuvenation
Not applicable: Canistrum cyathiformis has no woody framework to rejuvenate. Renewal happens naturally through the pup offsets that replace each rosette after it flowers, not through hard pruning.
Post-Pruning Care
After removing old leaves or a spent rosette, keep the plant in its usual humid, shaded conditions; no extra feeding is needed, and small cuts made with a clean tool heal without special aftercare.
Common Pruning Mistakes
- Cutting into the living, green base of a leaf instead of only the dead portion.
- Removing the flowered parent rosette before its pups are established, cutting off their food supply.
- Letting cut leaf debris sit in the central cup, which encourages rot.
When NOT to Prune
Avoid removing the parent rosette while pups are still small and dependent on it, and avoid cutting green, still-functional leaves purely for appearance.
Recommended Tools (by task)
- precision_snips: sized correctly for thin bromeliad leaf tissue and flower stalks — the only cut this plant ever needs.
Propagation Guide
Canistrum cyathiformis is best propagated by separating the offsets (“pups”) that form at the base of the rosette, which is also the only way to keep a particular cultivar or leaf coloration true. Seed is biologically possible but grows slowly toward a flowering-size plant and, as with most bromeliads, seedlings can vary from the parent; overall this plant is Easy to propagate by offsets.
Quick Propagation Specs
| Best Propagation Method | Offsets (pups / daughter plants) |
| Alternative Methods | Seed (slower, mainly for breeding or collecting) |
| Propagation Difficulty | Easy |
| Seed True-to-Type | Variable — daughter plants (offsets) are needed to keep the same cultivar |
| Vegetative True-to-Type | Yes |
| Best Propagation Season | Spring to summer in hardiness zone 10b, spring to autumn in zone 11, all year in zone 12+ |
Growing from Seed
Seed is a viable but slow route for this bromeliad, taking considerably longer than offsets to reach a flowering-size plant, and named cultivars or particular leaf coloration will not come true from seed.
Division, Offsets, Pups & Suckers
As with most bromeliads, this rosette eventually stops vegetative growth after flowering and produces offsets (“pups”) around its base. Wait until a pup is at least one-third to one-half the size of the parent rosette and has developed its own roots before separating it with a clean cut close to the parent stem — smaller, rootless pups are unlikely to establish well. Pot the offset into the same light, free-draining, epiphyte-style mix used for mature plants (or mount it on bark or cork as the species tolerates), keep it humid and in half to full shade out of direct sun while it establishes, and once rooted resume watering into the central rosette cup as for an adult plant.
Bloom & Flower Guide
Quick Details
- Bloom Season: Summer into autumn
- Flower Appearance: Yellow flowers set deep in the center of the rosette, framed by rounded pink-to-purple bracts
- Edibility: Not eaten – grown as an ornamental bromeliad
Detailed Blooming Overview
Canistrum cyathiformis is a bromeliad grown for its bold rosette and its central bloom. In summer and autumn the flowers rise from the heart of the plant, cradled by colorful bracts. It suits subtropical, Mediterranean and tropical gardens, or a bright indoor spot, in roughly zone 11 and warmer (zone 10b with good winter care).
Flower Characteristics
- Small yellow flowers gathered into a crown-like head in the center of the rosette.
- Surrounded by rounded bracts that color up from pink to purple – the real visual show.
- Held low, within the water-holding cup of leaves.
Bloom Care & Thinning
- Understanding the cycle: Like most bromeliads, each rosette flowers once and then slowly gives way to offsets (pups) that carry on the plant – leave the pups to grow on for future blooms.
- Position: Bright, indirect light and a little water kept in the central cup suit it best.
Pests, Diseases & Troubleshooting
Overview: Canistrum cyathiformis is a tank-forming bromeliad, and like its relatives it is troubled mainly by scale and mealybugs on the leaves, with the central water-holding cup being the critical weak point: stagnant, cold or dirty water there invites fatal heart and crown rot. As a valid tank bromeliad species it follows the genus pattern closely. Care is overwhelmingly cultural — bright indirect light, warmth, fresh water in the cup and a fast-draining, airy medium — with oils and soaps used sparingly and gently.
Quick Troubleshooting Overview
| Issue / Pest | Main Symptom | Primary Solution |
|---|---|---|
| Bromeliad (Boisduval) scale | White/yellow encrustations on leaves, esp. undersides | Wipe/scrape, light horticultural oil |
| Mealybugs | White cottony masses in leaf axils and central cup | Alcohol swab, insecticidal soap |
| Aphids | Colonies on the inflorescence and soft new growth | Rinse off, insecticidal soap |
| Heart / crown rot | Central rosette loosens, browns and pulls out | Fresh cup water, warmth, avoid cold-wet |
| Leaf spot | Brown/black spots or blotches on leaves | Airflow, sanitation, copper fungicide |
| Sunburn | Bleached or brown scorched leaf patches | Reduce light intensity, acclimatise gradually |
Common Pests & Management
- Bromeliad / Boisduval Scale (Diaspis boisduvalii):
- Symptoms: The classic bromeliad pest — white to pale-yellow, circular armoured scales encrusting leaves, concentrated on the undersides and in sheltered leaf bases, causing yellow blotching and weakening the plant.
- Prevention & Control: Inspect new plants before introducing them, wipe or gently scrape off colonies, and treat with a light horticultural oil or insecticidal soap, testing on one leaf first since some bromeliads are oil-sensitive; repeat to catch crawlers.
- Mealybugs (Pseudococcus, Planococcus spp.):
- Symptoms: White, cottony, waxy masses tucked deep into leaf axils and the central cup, with honeydew and sooty mould; root mealybugs may also infest the medium.
- Prevention & Control: Dab clusters with an alcohol-moistened swab, flush the cup with clean water, treat with insecticidal soap, and repot in fresh medium if roots are infested.
- Aphids (Aphis spp.):
- Symptoms: Soft-bodied colonies on the emerging flower spike and tender new growth, with honeydew.
- Prevention & Control: Rinse them off with water and spot-treat with insecticidal soap; usually a minor, occasional problem.
- Spider Mites (Tetranychus spp.):
- Symptoms: Fine stippling and slight webbing, mostly on plants grown too dry or in low humidity indoors.
- Prevention & Control: Raise humidity, rinse the foliage, and use insecticidal soap if they persist.
Diseases & Fungal Issues
- Heart / Crown Rot (Fusarium, Phytophthora, Erwinia bacterial):
- Symptoms: The most serious threat — the central rosette softens, browns and lifts out with a gentle tug, often smelling foul, after cold, waterlogged or stagnant conditions in the cup or medium.
- Treatment & Management: Prevention is everything: keep it warm, refresh the water in the cup regularly (using rainwater or soft water), never leave it cold and wet, and grow in an open, fast-draining mix; an early, mild case may be halted by draining the cup, drying out and drenching with copper.
- Fungal Leaf Spot (Helminthosporium, Colletotrichum spp.):
- Symptoms: Brown to black spots or water-soaked blotches on the leaves, enlarging in warm, humid, still air.
- Treatment & Management: Improve air movement, avoid wetting foliage late in the day, remove badly spotted leaves, and apply a copper fungicide if it spreads.
- Root Rot (Pythium / Phytophthora spp.):
- Symptoms: Wilting and decline from roots rotting in a soggy, airless medium.
- Treatment & Management: Use a coarse, free-draining epiphyte mix, water the medium sparingly, and repot if the mix has broken down and stays wet.
Growing Difficulties & Abiotic Problems
- Overwatering & Salt Build-up:
- Cause & Symptoms: A constantly soggy medium leads to rot, while hard tap water leaves mineral crusts and brown leaf tips as salts accumulate in the cup.
- Correction Strategy: Keep the medium on the dry side, water mainly into the cup, and flush the cup periodically with rainwater or distilled water to clear salts.
- Sunburn:
- Cause & Symptoms: Bleached, tan or brown scorched patches where the plant is exposed to sudden or excessive direct sun.
- Correction Strategy: Provide bright but filtered/indirect light and acclimatise gradually to any increase in intensity.
- Cold Damage:
- Cause & Symptoms: Brown, mushy or translucent leaf patches and increased rot risk after exposure to cold, especially combined with wet.
- Correction Strategy: Keep it warm and frost-free, and never leave the cup filled going into cold nights.
What Helps — Products & Tools
A soft cloth and cotton buds with rubbing alcohol handle most scale and mealybugs; light horticultural oil or insecticidal soap (patch-tested first) backs them up; and a copper fungicide covers leaf spot and early rot. The most important “tools” are clean rain or soft water for the cup and a coarse, fast-draining epiphyte medium.